logo fantastic modelers logo fantastic modelers logo fantastic modelers

maquette

Liste des maquettes

X-Wing T65

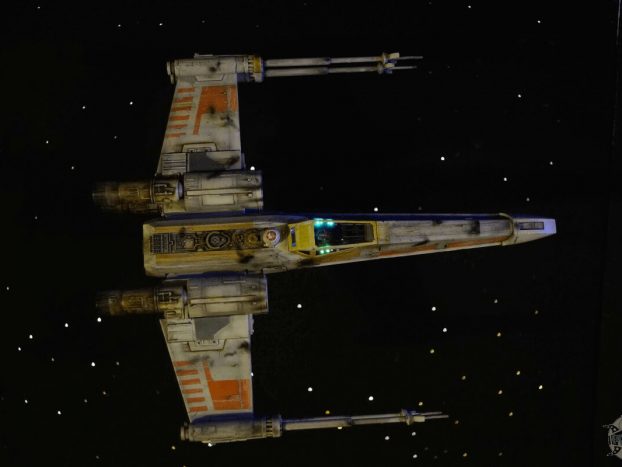
I’m offering you not only one X-Wing T65 but two ! Well, when I say “I’m offering”, it’s a figure of speech, I mean I’m offering you photos of two X-Wing because the ships are mine in fact… These two starfighters will be included in a huge diorama of the rebel fleet just before the attack on Endor. I wanted to show the heterogeneity of the rebel fleet by creating an old and worn out fighter alongside a newer one but not out of the factory, you can’t do that in Star Wars.

Finemolds, the brand that changed everything

I used of course the same kit for both of the models, it’s a FINEMOLDS ! Yes I love this brand I found out as everyone in les early 2000’s precisely with the X-Wing. It’s a very small japanese company (6 peaople at this time I guess) which attenpted an unbelievable poker strike : to produce a T65 X-Wing and a Tie Fighter without proper Lucasfilm licence and show George Lucas himself their work. The tale says that George was so impressed by the quality of their work that he gave them a free licence, just demanding a percentage on each sale (generosity has a limit). What a kind man George must be…

And there is the Light

x-wing fighter câblage

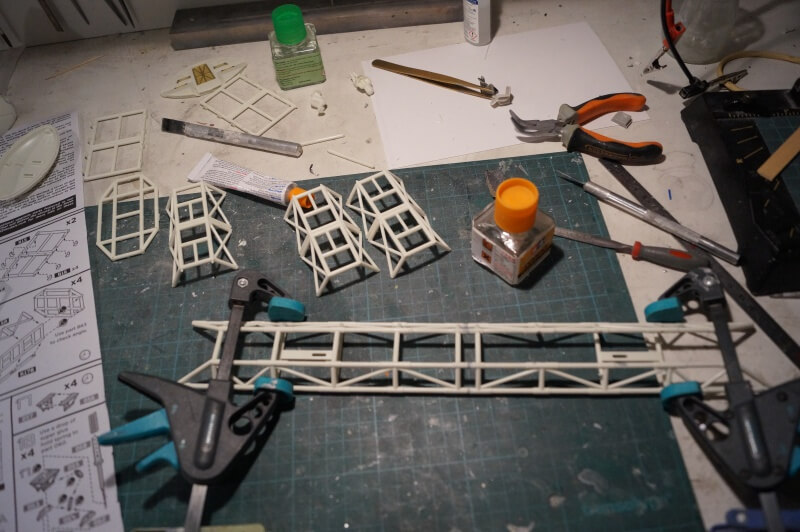
All you have to do with a Finemolds kit is throw the pieces onto your workbench and the kit is almost assembled. The only complication is to light-up the model, it’s not easy to insert electricity wires up to the thrusters. If there was only one, it could be fine but light-up the four thrusters withour noticing the wires is pretty hard.

x-wing fighter éclairage

Lighting-up the cockpit was not easier. The hull is very thin éand inserting the wires and the LED is also very hard. I glued a fiber-optic bundle onto a white LED. Then, I had to insert the fibers into very small holes drilled in the dashboard. One fiber is also inserted into the astromecano droid. Everything is very small, for example the droid dome diameter is only 8mm…

Drilling the X-Wing T65 canons

x-wing fighter perçage du canon

Speaking of small things, Finemolds forgot an important detail, the canons are not drilled, which is not very realistic :

“-Hey Luke, hurry up, shoot this Tie fighter which is just beind me !

-All right Wedge, I’m on it…”

BOOOUUUMMM !!! The hero’s X-Wing blew up because somebody forgot to remove the canon corks. Don’t laugh, I’m pretty sure it happened many times during the real wars… So I had to drill a 0.6 mm hole at the center of a circular area of 1mm diameter. Believe it or not, it’s quite a transcendent experience !

Exhibitions of the T65 X-Wing

Like the A-Wing and the B-Wing, these two X-Wing T65 models have been shown during 5 conventions :

Today they lie in my personnal collection. They are inculded in a big diorama represanting a complete rebel fleet : ‘Sullust”.

You may click here to see the complete Sullust rebel fleet

Posted on 29 December 2017 by petersteven in

B-Wing

b-wing fighter

The name of the kit “Cruciform fighter” and no “B-Wing“may be surprising. Well, it’s a “garage kit”, that means a resin kit produced in very low numbers ; my bank manager still remembers the day I bought it… Those kits are non-licenced products and can’t have a licenced name, making them even more difficult to find. Attention : nothing illegal here ! The manufacturers are merely limited in the numbers of copies they are allowed to cast. Lucasfilm takes also advantage of that : fair and free advertising for the Star Wars licence. Everybody’s happy.

Resin kits : another approach

b-wing brochette

Unlike injected plastic kits, the parts are very often filled therefore heavy, which needs some care during the assembly. A simple gluing between parts won’t work most of the time : the model

would be too breakable. Therefore, I built this B-Wong like a brochette, threading the different sections one after another around two brass rods.

The rods also allowed me to bring the current in all sections of the ship. So I could insert the different lighting LEDs in the structure itself and solder them on the rods. Two rods were needed : on for + pole, one for – pole.

b-wing canons

Resin kits are more difficult to build than plastic ones. The matter is softer and thin parts like guns tend to curve. It’s often necessary to scratch these parts with harder matters like brass or steel.

B-Wing cockpit detailing

The cockpit has been entirely detailed. Cockpits are usually poorly detailed in garage kits. Most of the time, they show only a few details hardly evoking a command panel. Unacceptable if you want to make a high level model. You will have to do kitbash to improve the model. This technique requires a few imagination to think up the final painted rendering. I often have my own doubts during the process…

b-wing endor sullustéen

I wanted to have a sullustean pilot because everyone knows (every star wars fan at least) that B-Wings are very hard to take in hand and only the greatest pilots can. Sullustean are well known to be the best pilots (what a racial determinism…). I got a Nien Nunb fig I decapited and whose I glued the head on WW2 pilot, scaled 1 : 48. The rendering is pretty good (boom, a self congratulation, if I don’t congratulate myself, who will ?) ; the sullustean all have similar heads.

Like his little brother the A-Wing, this model is now part of a huge diorama represanting a complete rebel fleet : “Sullust“. I’ve shown this B-Wing during 5 conventions :

You may click here to see the complete Sullust diorama

Posted on 26 December 2017 by petersteven in

RZ-1 A-Wing

A-Wing RZ-1 interceptor

In the orginal trilogy, the rebel alliance can field four starfighters type. Between the old BTL-A4 Y-Wing put into active duty during the Clone War and the new B-Wing, the famous multipurpose fighter X-Wing T65 and the fast light starfighter RZ-1 A-Wing can be seen. Maybe it’s not the most interesting design of the saga (in fact it’s just a lightly modified plane) but a Star Wars model collection cannot be considered complete without a RZ-1 A-Wing.

Relief engraving or hollow engraving

Until recently, A-Wing models were pretty hard to find . The range of solutions was reduced to the old AMT kit, produced in the 90’s but made from a mold bought to Airfix in the 80’s. At this time, nobody cared about scales. This kit’s one may be 1:48 or may be not. I decided it is. One interesting feature is the relief engraving of the panel lines. This feature wasn’t rare on models at that time. But I sense you wondering : what is relief engraving ?

Producing a plastic model kit requires plastic injection into a metalic mold. Obviously, it’ easier to engrave a groove on the mold leading to a relief on the final plastic part than the doing the opposite. Unfortunately, this is not realistic at all : lines between armored panels of a vehicule shall be grooves and not reliefs.

Aaaaahhhhh !

Commander Arvel Crynyd

The longest work on a kit like this one is to sand the panel lines and engrave new ones exactly at the same place. The engraving itself requires a worn scalpel and strips for Dymo labelling machine for straight engraving. The work consist of scribing again and again the line then sanding again and again in order to remove enough matter.

Detailing the RZ-1 A-Wing

The ship was lighted-up into the trusters and the cockpit as always do in my models. The pilot is a modified WW2 soldier.

a-wing endor missiles

I added two missiles-launchers beind the two side gaps. I used parts from tanks models and WW2 brass explosive shells. Spending so much time detailing almost invisible parts like that could appear weird. Well… it isn what else could I say ? Let’s say they are a little visible…

Exhibitions

This model has been seen during 5 conventions, it’s now a part of huge diorama called Sullust. :

Click here to go to the “Sullust” diorama (in french for now).

Posted on 24 December 2017 by petersteven in

Eagle Transporter

Eagle transporter cosmos space 1999

Wether you like the series Space 1999 or not (and personnaly, I’m no big fan), you have to admit that the Eagle Transporter models had hell of look. The design, simultaneously futuristic and a little bit awkward already prefigure the “industrial” design of Star Wars, produced one year after the series began. The base structure of the vehicle is tubular, the cockpit only is sealed. The ship center is filled with by a transport module, sealed as well but removable. In line with the task assigned (being crashed, being destroyed, being anihilated etc.) the center module can be adapted. By the way, others variations of the model has been produced by the manufactrer. Maybe one day will I make a different Eagle.

Canibalism

eagle cosmos 1999 apollo module

This model has been ordered to me in 2016 by a client, fan of Space 1999. I spent almost 3 monthes building it, its structure being rather complex. It’s an interesting model showing many accurate parts ; the two halves of an Eagle from the Apollo program can be recognized on the hull. I’m sure it was an easter egg from the modelists working on the series. The odds are pretty good the modelists had taken them from a Saturn V model and really used them on the filming models. You can see them inside the orange circle on the picture to the right.

This practicing was very common in the TV and movies modeling workshops : rather than creating original parts, long and expensive process, using parts from an existing kit is more convenient. This technique is called “kitbash”.

Split lines

eagle cosmso 1999 tube structure

Unfortunately, because of the tubular structure of the Eagle Transporter, I had to bear quite long sanding works. A model kit is frequently found to have what is called “split lines” where the two halves of the mold are jointing during the production of a part. A few liquid plastic always finds its way between the two parts of the mold. The result is an ungracefull split line along almost every parts of a model. If you ask a model maker his schedule, he would answer : “I sand plastic and I clean my airbrush, nothing else”. On this model, I spent hours to sand many meters of tubes to elminate those %ùç#!!&&@ split lines.

The building work however complex is quite enjoyable but it requires a lot of putty to mask the joints between parts. The paint job is nice to do ont the flat parts, the panelling is made with stencils. It is more boring on the tubular parts, nothing should be forgotten.

The base represents a lunar ground. First I wanted to make an orange cross landing runway as shown in the series but a lack of plastic card made me change my mind. I finally made a lunar ground using plaster coating. I sculpted the relief, waiting the coating had began to dry. The paint job is made with an airbrush at grazing incidence.

Exhibitions of the Eagle Transporter model

This model has been shown two times in conventions :

Today, its owner pampers it lovingly in Switzerland (well, I hope so…)

Posted on 17 December 2017 by petersteven in