logo fantastic modelers logo fantastic modelers logo fantastic modelers

diorama

Liste des dioramas

The secret of the Swordfish

Diorama Le secret de l'Espadon - vue trois quart

I’ve already made a Blake and Mortimer diorama, the reproduction of the Yellow M cover. It seems to have been popular because in no time at all, a private collector ordered me a copy. And he asked me too to make this second diorama of the third volume cover of the Secret of the Swordfish. This sentence won the international contest of the “of the” sentences last year.

The structure of the Secret of the Swordfish diorama

Designing such a huge diorama require an overall plan before focussing on the models, textures and decoration. You must see it like a painting.

On this one, the structure is simply wooden-made : battens and plywood. Salvage for the most.

The “ground” of the diorama -which will support the see- is made with cardboard-foam. This will allow to sculpt the relief of the see.

Le secret de l'Espadon : structure du diorama.

The models

The swordfish

The leading role is played by a Sworfish edtied years ago by Hachette (in France). It come from a range of models called “Blake and Mortimer cars and vehicules”. The model is quite good-looking -except for the inner cockpit, as is often the case.

L'Espadon de Blake et Mortimer par les éditions Hachette

The “yellows destroyers

The destroyers drawn by E. P. Jacobs in 1947 looked very much like the WW2 battleships. In particular the japanese ones. I started my work from a 1:350 Yamato and her escort ship.

Destroyer Yamato de chez Fujimi.

The water

The ground texture

In order to create a convincing sea, I started by gluing a cardboard-foam plaque onj the bottom of the diorama. Then I worked directly with acetone. The acetone, a very strong solvent, dissolves the foam at the surface inhomogeneously : then you get hollows and bumps. Waves in a word.

However, the texture is not yet convincing. I wanted something smooth enough to figure the water at this scale. I covered the cardoard-foam with thin paper. It was hard to find the right thickness : too thick and the relief details are concealed, too thin and the flaws of the surface are too visible.

Painting the sea

I painted the sea with an airbrush in green shading (like in the comic book), lighter of the top of the waves.

Diorama le secret de l'Espadon : la mer

The surface texture

The painting rendering is not good enough to figure the sea. We need reflexions, a bright finish reminding water.

No imporbable tricks for this part… Hre comes the time to admit that expensive products bought on specialists website are the best. I applied many layers of “water gel” from AK. That’s oit, no more to say, this product is amazing.

Diorama le secret de l'Espadon : texture de la mer, écume.

The foam is made with very light grey painting. In order to thicken the foam, I melted it with some water gel.
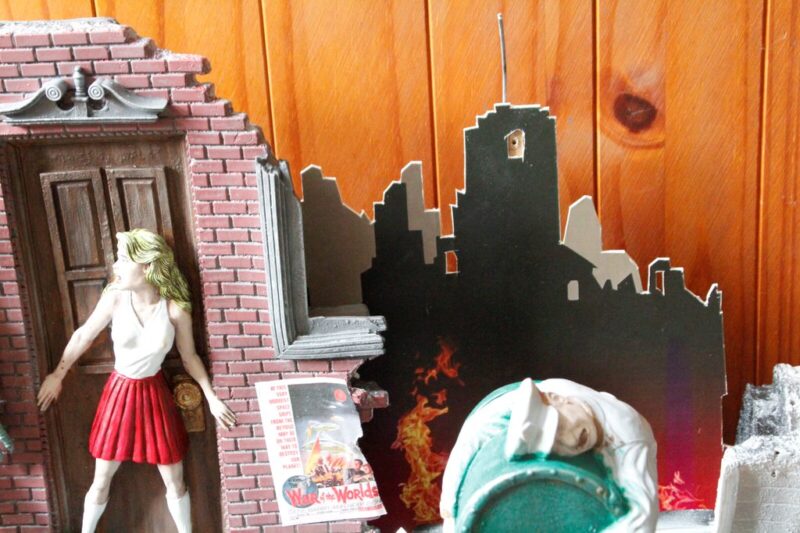
Explosions

The book cover shows many explosions. I couldn’t fail in making them. It took a long time to come up with the process. Here is what work best :

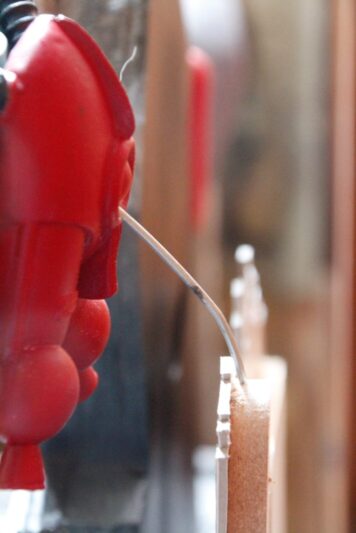
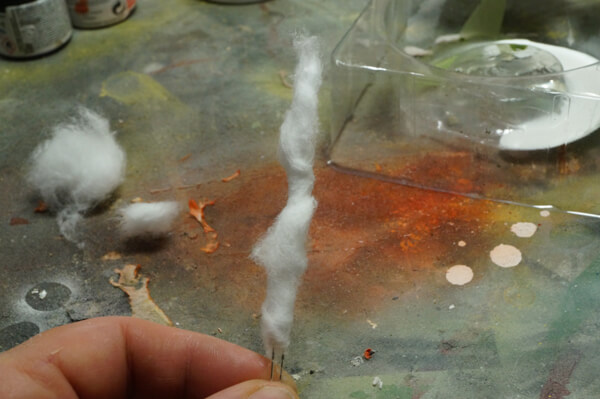
  • Transparent sanded rods to diffuse the light
  • The volume is made with make-up remover (cotton)
  • White glue for the blinder
  • Red LEDs for the light, glued at the base of the rods.

Here is the secret of the SwordFish : it blows evrything with nukes missiles !

The result :

Diorama le secret de l'Espadon : réalisation d'une explosion.

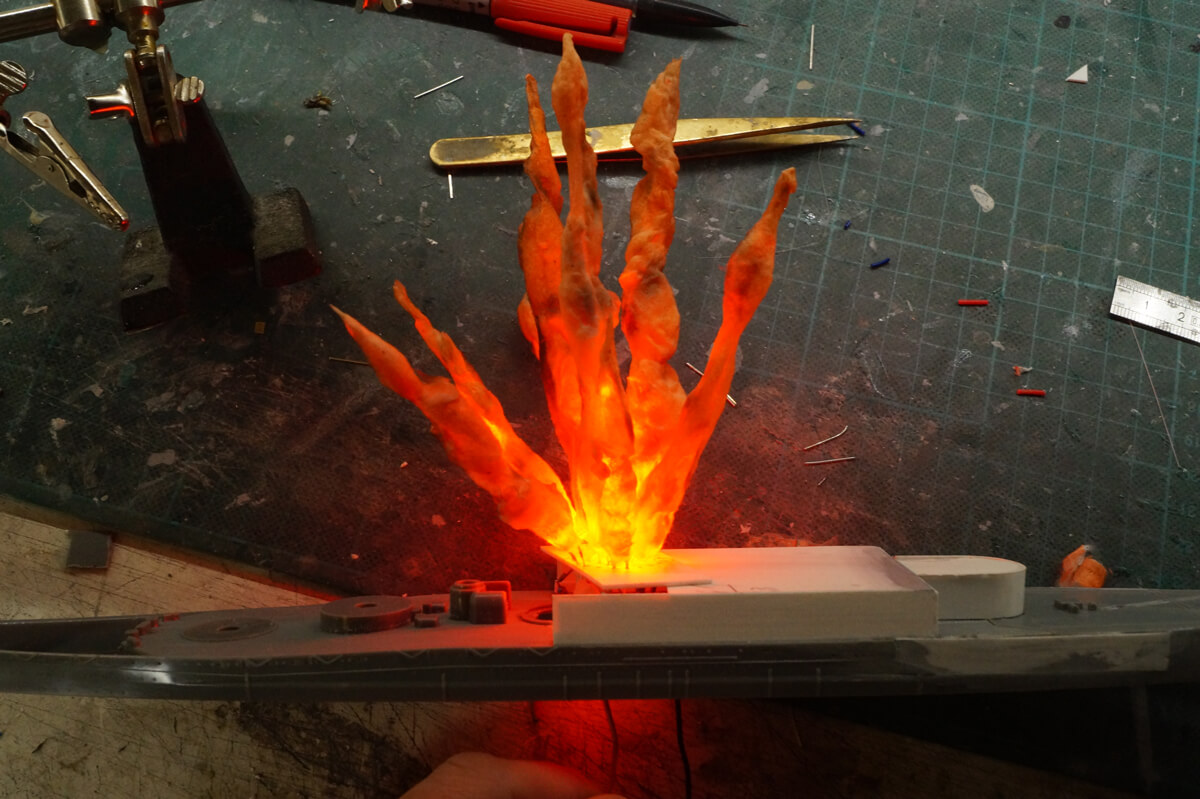
Avouez que ça en jette. Si, avouez, je sais que vous le pensez, n’essayez pas de le nier.

You have to admit, it’s quite somthing. Yes, admit it, I know you think that, no need to deny.

The secret of the SwordFish : a multiscaled diorama.

I’ve already made a multi-scale diorama, the Star Wars rebel fleet over Sullust. The idea consists in making small scaled models on the background and large ones on the front. In thsi diorama, there are 3 approximatives scales :

  • The background : sky et secret-base-rock
  • The ships (almost 1:350)
  • The swordfish (almost 1:72)

Therefore, there is an interesting depth effect allowing to show simultaneousely capital vehicules (ships, huge spaceships) and smaller ones (fighters, monoplace spaceships).

An interesting and unusual project for me, as I am a usually a Star Wars man. Unfortunately, I couldn’t expose this diorama since it was delivered to its owner immediately after it was achieved, in Spain.

Posted on 20 December 2021 by petersteven in

The black Lord of the Sith

I will keep it in short on this assembly which is not very complicated. The four kits I used here are all from Bandai. These are figurines designed like models. Two models in this diorama : Darth Vader and 3 stormtroopers.

The concept is very interesting : the figurines’ assembly is very like a model kit one. Many parts to assemble together, a large scale allowing a model kit paintjob. I’m not really a good fig-artist like philigore. Therefore I really liked this idea consisting of assembling a figurine like a model kit. Finally, I can insert quality figurines in my dioramas.

Here are the two boxarts of those models :

Stormtroopers assembly

The building is quite long, there are really a lots of parts for a model of this size. Bandai arrange this very well, the fig is fully articulated : elbow, wrist, knees, neck… Everything can be oriented where you want.

Here ares the parts :

Diorama le seigneur noir des Sith : grappes des modèles bandai de stormtrooper.
Many small parts allow to articulate the entire figurine

The challenge is to choose a pose for the figurine and then I immobilise it. Why immobilising, you’d say ? First, know that I don’t really like people asking tactless questions like that. Who do you think you are, mmmhh ?

Well, where was I before I got interrupted so roughly by myself ? Ah, yes, why immobilising the figurine. Note that it is not unavoidable but if you don’t do it, the joints will remain noticeable and unrealistic. Therefore, I had to drown the joints into a sculpt putty, the Magic Scult. It is a 2 components putty, a resin and a catalyst. You may find it at the excellent adress : Green Stuff World.

You must first mix the two components by beating them during quite a moment.

The result is a easy-to-sculpt putty. It can also be smoothed using water. I have this putty for years now and except the yellowing of the catalyst, it’s in perfect shape.

The main difficulty consists of grouting the joint and the rest of the arm or leg.

The stromtroopers have 3 different poses :

  • A dead, deceased, lifeless, liquidated, perished, defunct one
  • A stormtrooper in firing position to bring cover to the dark lord of the Sith. No danger at all for anybody.
  • The third is walking to reach his firing position behind Vader

Assembly of Darth Vader, the dark lord of the Sith

If this is a consular ship, where is the ambassador ?

Darth Vader

Well 30 years after seeing the movie for the forst time, I still don’t know what “consular” means. But I could assemble this Vader model anyway. The most difficult part was to thread the electrical wires to enlight the two small green LEDs in the belt :

Darth Vader, le seigneur noir des Sith, ceinture éclairée

Surprisingly, the wires don’t go threw the legs as you could think at first but in the thickness of the cape.

I had to rework the cape itself with wet glued paper to get a fabric effect. Unfortunaltely I couldn’t make it look slimmer. I’ll do better next time.

Darth VAder : jointures des coudes

The work on the joints was more complicated since I had to recreate the bumpy leather texture. the result is satisfying.

I used Magic sculptu again with a sort of rubber paintbrush like these.

The decor

Nothing complicated here, just a wooden structure and a plastic casing. The main tint is a white lightly colored in purple.

Conclusion

A nice little diorama I exposed 2 or 3 times in Migennes and Cusset. It made me want to try others figurines in this serie since they are a very interesting concept.

Posted on 21 November 2021 by petersteven in

Mars attacks diorama

Mars attacks : diorama complet

I got the holly Graal in 2019. Two kits from the former company Screamin specialized in vinyl kits : horror, fantastic and SF characters. But I had a real problem : I had no time to make any new diorama for years, where could I find the time to ?

As if by chance, a new phenomenon occured and allowed me to spend two months between March and May 2020. Things aren’t going well ? Let’s g for a Mars attacks diorama.

Presentation of the kit

kit mars attacks no place to hide

The first part of this kit is called “No place to hide”. it features un young woman hiding from a martian while her friend is dying on the ground, partially squashed.

kit mars attacks slaughter in the street

The second part intitled “Slaughter in the streets” (a very full agenda) featuring a flying martian, a cop and a dog. the dog is cut in the half and both have guts spread on the floor. Look at the details on the cop hanging on the mailbox while the rest of his body is spreading on the ground.

Vinyl kits : the modelist’s nightmare

Teenage girl afraid

Very well-known during the 80’s, vinyl kits were not made of LP discs recycled and melted as conventional wisdom suggests. Vinyl is a pretty flexible matter requiring a very specific work. I invite you to watch my friend’s video featuring a vinyl kit.

With those kits, things got even funnier because we can find both vinyl and low-quality resin parts.

Diorama Mars Attacks : assemblage du décor

After cleaning the kit with hot water and soap, the different parts are glued together on big wooden board. The diorama is 60cm width.

The vinyl can be softened using hot water or an hair dryer. Then you can give it the wanted shape. The ground of the diorama is strongly attached on the board so the small parts can keep their shape. With bigger parts (the Star Wars Rancor for example), you’ll have to use a metallic structure and a polyurethan foam. It is a great deal to use thie foam because it’s light and hard at the same time so the model can keep its shape easily.

le kit assemblé

Martian pieces

on perce, on assemble

As I said before, martian are made od different matters. Members are resin made but a single spot of cyano glue is not enough. They must be reinforced with metal rods to be sure the character stands correctly and don’t fall appart later. Every member is drilled at the edge and a rod is sot into the hole to assemble and stiffen the pieces.

un martien pré-assemblé

And that’s it, the body newly assembled. The head is phosphorescent but once painted, this is completely useless. The bust is made in the same matter. Only the legs are resin made and must be sanded and retouched because the draws isn’t totaly flawless.

The martian stands well as you can see on the picture. The kit designers can be congratulated as they thought to equip him with kneecaps. So we can choose how to place him without endless modifications.

We come in peace

Mars attacks : le dioramadans son ensemble

So, first encounter between martains and humans. A grey underlayer have ben sprayed on the decor far a better readability. The second reason is that the acrylic paint I use is incompatible with vinyl.

Martians are in place. The one flying doesn’t stand still. He is too far from the ground and the rod curves. He tilts like a big sea lion beer-drunk (french expression, untranslatable). As for his fellow, I wanted him to snake behing the wall. Well, the easiest part is now done.

No arms, no chocolate (another french expression…)

Mars attacks : de la sculpture numérique à l'impression 3D

Well. i forgat this detail. The girl’s arm half melted on the floor is hugly. As if by chance, resin made.

Digital sculpture and 3D printing to the rescue. They are the new modelist’s friends.

First step, sculpting under Zbrush, 3D printing and let’s go, a brand new harm.

Paintbrushes will be hot…

Mars attacks : head paint

Last step wich is going to bring the diorama to life, the paintjob is an essential part of a diorama. You may have the most astonashing decor, if your little nephew Kevin, 2 years old do the paintjob, everything is good for garbage.

On this diorama, we may have a lot of fun :

  • Human and extraterrestrial characters
  • Different matters (wood, stones, blood, guts, bricks, concrete etc.)
  • Animals (dead dog, rats)
  • different metals

As for painting technics, nothing very original. Acrlic paints I use for decades now : Liquitex and paintbrushes. the only issue were the encrusted characters. usually, we can turn the piece in your hand but this time, I had to turn around the decor.

Finitions et détails du diorama Mars Attacks

Mars attacks : détail du diorama

The Mars attacks diorama is coming to an end (so is the first confinement). But there is still many work to do. Additional details must be added. Bricks here and there, grass, stones, ruins, magazines and 50’s papers…

Many little things that brings the decor to life. I also decided to add a background featuring an illustration of a ruin on fire. This background fills the void in this section of the diorama and allows to use a shorter rod to sustain the flying martian.

For conclusion, I’d say I spent a huge amont of time on this diorama. Good thing, I had plenty of time. Despite the few flaws of these kits, their nostalgic look and their oringinality are no longer seen nowdays. It’s a shame that a brand like Screamin non longer exists. It was the perfect mix between the garage kit and the licenced one.

Tnaks to internet and the abundant e-commerce websites, we can easily get those collector kits. The only cloud in the horizon is the price wich became unfortunately totally crazy for some of those kits.

Posted on 18 October 2021 by petersteven in

Battle of Naboo

The first movie in chronoligical order, “The Phantom Menace” is certainly the less appreciated in the all saga. Well, “The Last Jedi” is also on the podium but for completely different reasons. However, even if the film directing and the acting performence of the main actors isn’t flawless (well, I guess that’s a lot for one single movie), I think the universe works well. The costumes, the decors and the vehicules are just perfect, especially during the final scene : the battle of Naboo. For this reason, I wanted to pay tribute to this movie despite its flaws.

During the battle of Naboo, the action is divided in four parts :

  • The ground assault between the gungans and the tanks droids
  • The royal guards and queen Amidal’s commando action inside the main palace
  • The “threesome” Gui-Gon JinnObi Wan Kenobi Darth Maul
  • The space battle

This splitting may be damagable to the dynamic of the film end : too less screen time for each. And it’s a shame for the space one because it shows very interesting models.

The main protagonist of the battle of Naboo : the Naboo N-1 fighter

The making of this model was pretty harsh. The choice of the kit was obvious. Only two AMT kits existed by this time : one plastic made, the other metal made. I chose the plastic one for practical reasons :

This is a very simplistic model as they were made at this time : no glue, no painting, less than a dozen parts to snap together. Of course I strongly improved it. Lets’ see how I did.

The assembly

First I had to design the light up. Not easy, the current has to go through the very thin wings of the ship. I used two small brass rods swamped into the thickness of the wings. As we can see on the picture, I dug a trench with my Dremel, put the rods and re-filled it with putty.

Second problem, only a thin circular border of light is visible at the rear of the thrusters. First, I closed the thruster with a piece of tracing paper.

Then, the “rats tails” so distinctive were glued directly on the tracing paper. And here is the result :

Maquette de chasseur Naboo N1 éclairé

I will not dwell on the paintjob and the cockpit detailing, very classical. Just one originality, the painting finish is gloss contrary to the usual Star Wars models.

The paintjob

Oddly, the gloss paintings must not be used. Too thick, they swamp details, stopper airbrushes and it is very hard to make a good weathering on them. Moreover, the tiniest sanding mistake is seen like a democrat militant in a NRA convention. So, mat painting covered with a lot of gloss varnish “klir“.

The chromed part is made with an Alclad slilver-chrom painting sprayed in several layers, more or less intense, depending on the area :

It seems that I haven’t talked about Alclad painting yet. They are very quality paintings used to obtain truly amazing metallic renderings.

You must absolutely use an airbrush, they are very fluid and very delicate once dry. For example, if you put yout finger on it, you can get a very nice fingerprint. Si if you do’nt want to get a “CSI : Miami” diorama, handle your models with gloves.

The Alcald paintings must be srpayed on a gloss black primer in very thin coatings. Just see here to get more details on the technics.

Now, this is podracing !

Anakin Skywalker

The pursuers : droid fighters

The droid fighters are very small, very simple to assemble (only 4 parts) but hard to light up. Indeed, I had to insert two LED’s, one for each eye. There is not much room to do that in the droid head and I had to spray many silver and black layers to hold back the light leaks.

Cuting the eyes was a delicate operation, the plastic is very thick here. The final reslut is satisfying :

The decor of the battle of Naboo

I chose for decor a section of the Lucrehulk cruiser of the Trade Federation. They are the huge ring-shaped ships used by the trade federation to lead the blocus of Naboo :

Not easy to identify a huge ship only by seeing a small section. So i chose two distincive elements : a parabolic antenna and a quadlaser battery.

I’ll only talk about the quadlaser, which was very fun to make. Indeed, it’s a nasty scratchbuil/kitbash with tank and various salvage parts, plastic card.

The two big “ears” of the gun ars two bottle caps.

The base of the guns themselves are simply Pilot pens’ tubes. The spear is made from the guns of a Jedi fighter Actis Eta-2 model by Revell.

And the final result, after paintjob :

Conclusion

Finally, a comprehensie diorama, not really dealt with on the web. It allowed me to approach the prelogy which is still interesting to represent in modelism despite its cinematrographic flaws.

By the way, I got a third price in a Starship Modelers contest with this diorama. If I don’t congratulate myself, who will ?

Posted on 24 March 2021 by petersteven in